Part A. Data Collection [10 pt]
So far, we have worked with data sets that have been collected, cleaned, and curated by machine learning researchers and practitioners. Datasets like MNIST and CIFAR are often used as toy examples, both by students and by researchers testing new machine learning models.
In the real world, getting a clean data set is never that easy. More than half the work in applying machine learning is finding, gathering, cleaning, and formatting your data set.
The purpose of this lab is to help you gain experience gathering your own data set, and understand the challenges involved in the data cleaning process.
American Sign Language
American Sign Language (ASL) is a complete, complex language that employs signs made by moving the hands combined with facial expressions and postures of the body. It is the primary language of many North Americans who are deaf and is one of several communication options used by people who are deaf or hard-of-hearing.
The hand gestures representing English alphabet are shown below. This lab focuses on classifying a subset of these hand gesture images using convolutional neural networks. Specifically, given an image of a hand showing one of the letters A-I, we want to detect which letter is being represented.

Generating Data
We will produce the images required for this lab by ourselves. Each student will collect, clean and submit three images each of Americal Sign Language gestures for letters A - I (total of 27 images) Steps involved in data collection
- Familiarize yourself with American Sign Language gestures for letters from A - I (9 letters).
- Take three pictures at slightly different orientation for each letter gesture using your
mobile phone.
- Ensure adequate lighting while you are capturing the images.
- Use a white wall as your background.
- Use your right hand to create gestures (for consistency).
- Keep your right hand fairly apart from your body and any other obstructions.
- Avoid having shadows on parts of your hand.
- Transfer the images to your laptop for cleaning.
Cleaning Data
To simplify the machine learning the task, we will standardize the training images. We will make sure that all our images are of the same size (224 x 224 pixels RGB), and have the hand in the center of the cropped regions.
You may use the following applications to crop and resize your images:
Mac
- Use Preview: – Holding down CMD + Shift will keep a square aspect ratio while selecting the hand area. – Resize to 224x224 pixels.
Windows 10
- Use Photos app to edit and crop the image and keep the aspect ratio a square.
- Use Paint to resize the image to the final image size of 224x224 pixels.
Linux
- You can use GIMP, imagemagick, or other tools of your choosing. You may also use online tools such as http://picresize.com All the above steps are illustrative only. You need not follow these steps but following these will ensure that you produce a good quality dataset. You will be judged based on the quality of the images alone. Please do not edit your photos in any other way. You should not need to change the aspect ratio of your image. You also should not digitally remove the background or shadows—instead, take photos with a white background and minimal shadows.
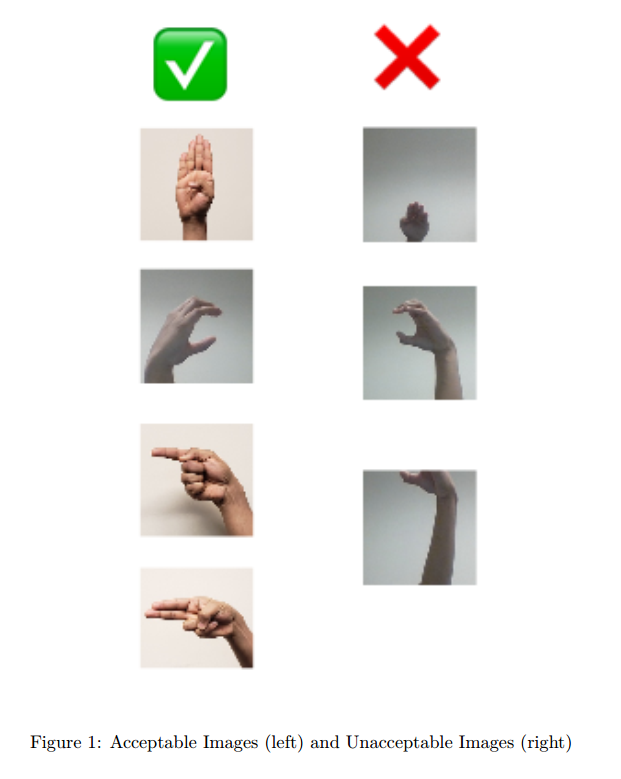
Accepted Images
Images will be accepted and graded based on the criteria below
- The final image should be size 224x224 pixels (RGB).
- The file format should be a .jpg file.
- The hand should be approximately centered on the frame.
- The hand should not be obscured or cut off.
- The photos follows the ASL gestures posted earlier.
- The photos were not edited in any other way (e.g. no electronic removal of shadows or background).
Submission
Submit a zip file containing your images. There should be a total of 27 images (3 for each category)
- Individual image file names should follow the convention of student-number_Alphabet_file-number.jpg (e.g. 100343434_A_1.jpg)
- Zip all the images together and name it with the following convention: last-name_student-number.zip (e.g. last-name_100343434.zip).
- Submit the zipped folder. We will be anonymizing and combining the images that everyone submits. We will announce when the combined data set will be available for download.